

Power Query REA Form
Using a Power Query Table as a Review, Edit and Append Form ( REA )
A new Method of Excel Development
Using a Power Query Table as a Data Review Edit and Append Entry Form.
In This Post: We demonstrate how to quickly and easily select, review, edit, and append new records from an external data source to a local Excel Table using a Power Query Table and a small amount of VBA. ( aka REA )
The Focus: “New” records; records not in the local Excel Table. Thus, ignoring records already in the local Table.
The Approach: Rather than automatically appending every new record, this approach gives users the flexibility to review incoming data, make any necessary changes, and select exactly which records should be added to the destination table.
- Ease of Use: Here we use a series of Slicers to determine which records are selected, thus appended.
The Result: A simple yet powerful Review, Edit, and Append (REA) process that combines the strengths of Power Query, Excel Tables, Slicers, CheckBoxes, Drop-Downs, and VBA automation.
The Solution: We show each of the components used to make the demo functional.
Why use a PQ REA Form: Is easy to implement, requires minimal code, and provides a practical alternative to more complex Excel UserForms.

877.392.3539
Info@ExcelAndAccess.Com
Video below is of a self-referencing query, vba is not used. Future blog post.
LinkedIn Survey on using a Power Query Table as an REA Data Form

We conducted a survey on LinkedIn on using Power Query Table as an REA Form.
In this post, we use a Power Query Table as a Custom Data-Entry Form
~ Review, Edit and Append Selected Records via a PQ Table ~
While this is not yet a common approach among Excel developers, its use is steadily increasing as more programmers become aware of the flexibility and power that Power Query provides.
Traditionally, data-entry forms in Excel have been built using VBA UserForms or custom onsheet forms. However, by combining Power Query with Excel Tables, Data Validation lists, Checkboxes, and VBA Automation, it is possible to create a lightweight and highly effective, Excel based data-entry interface without the complexity of traditional form development.
This approach to Excel development offers several advantages:
* Familiar Excel-based user experience. Very similar to Excel Tables.
* Controlled user input through data validation options.
* Easy review and editing of incoming data, visually.
* Seamless integration with Power Query transformation and refresh processes.
* Reduced development and maintenance effort compared to custom VBA forms.
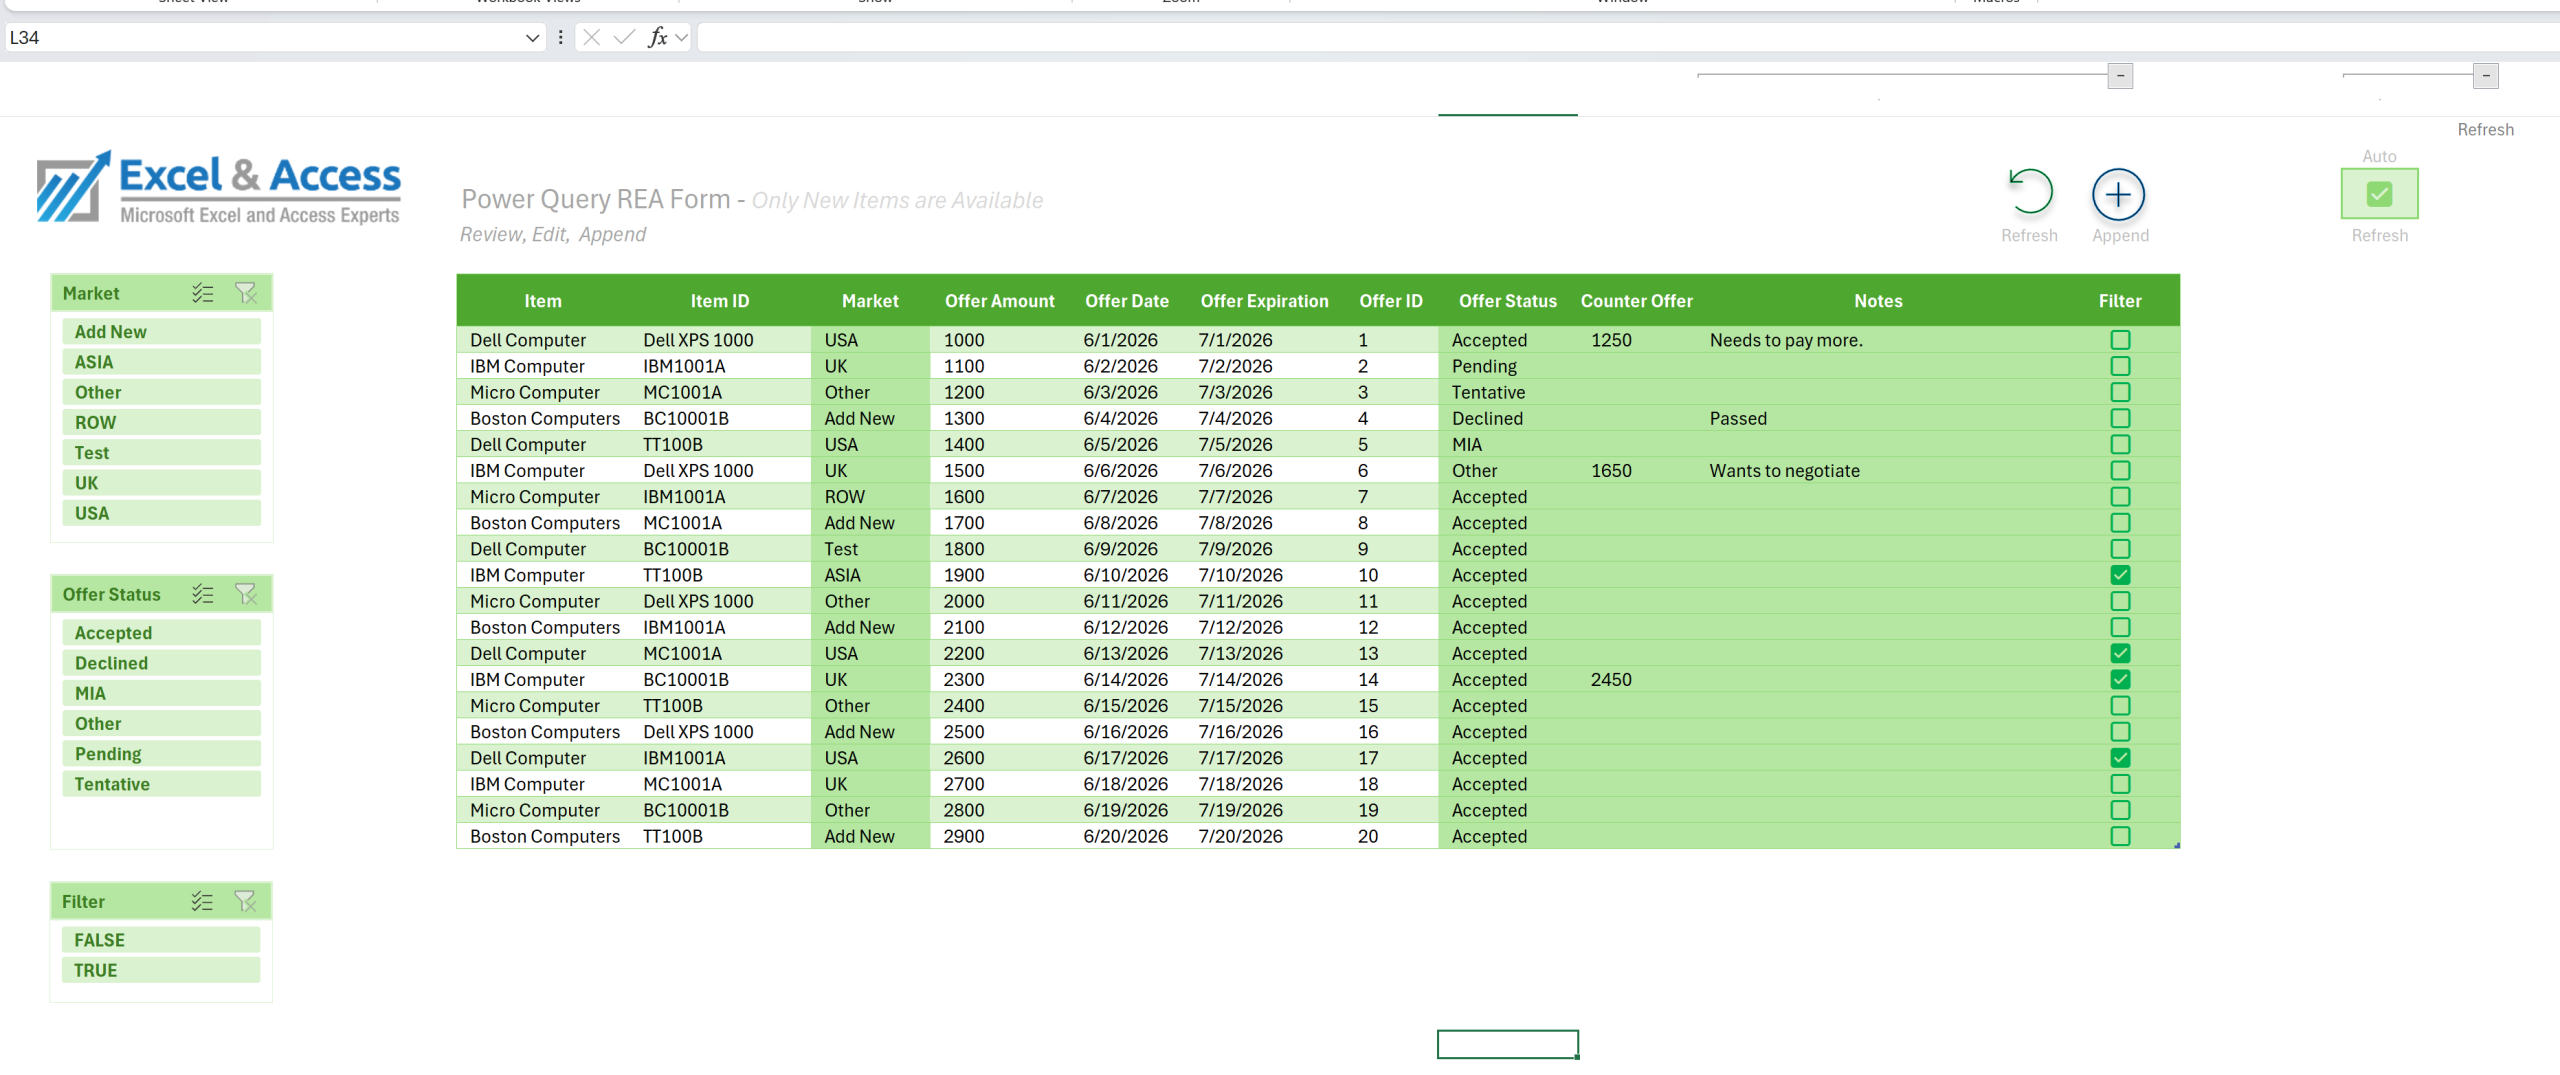
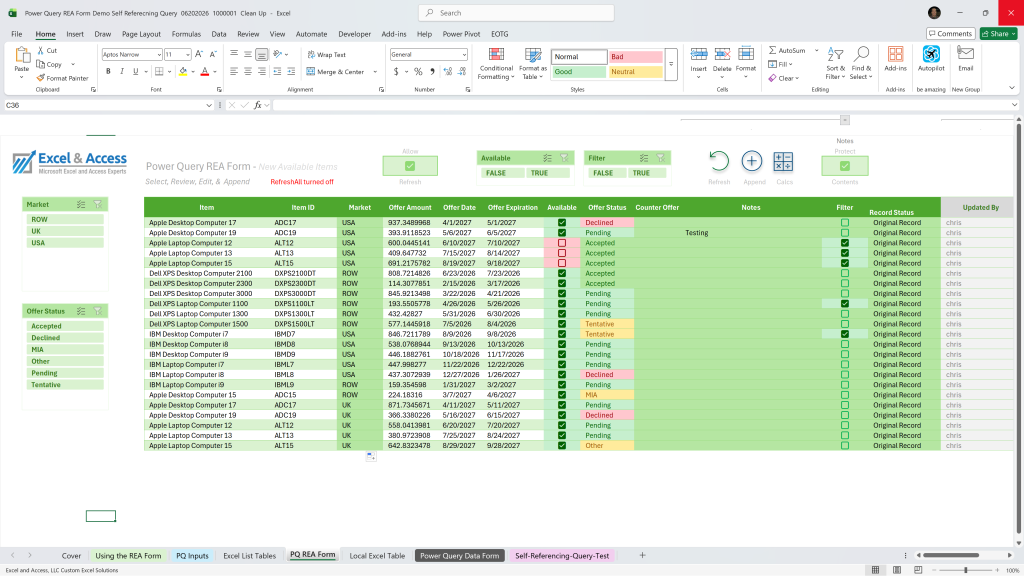
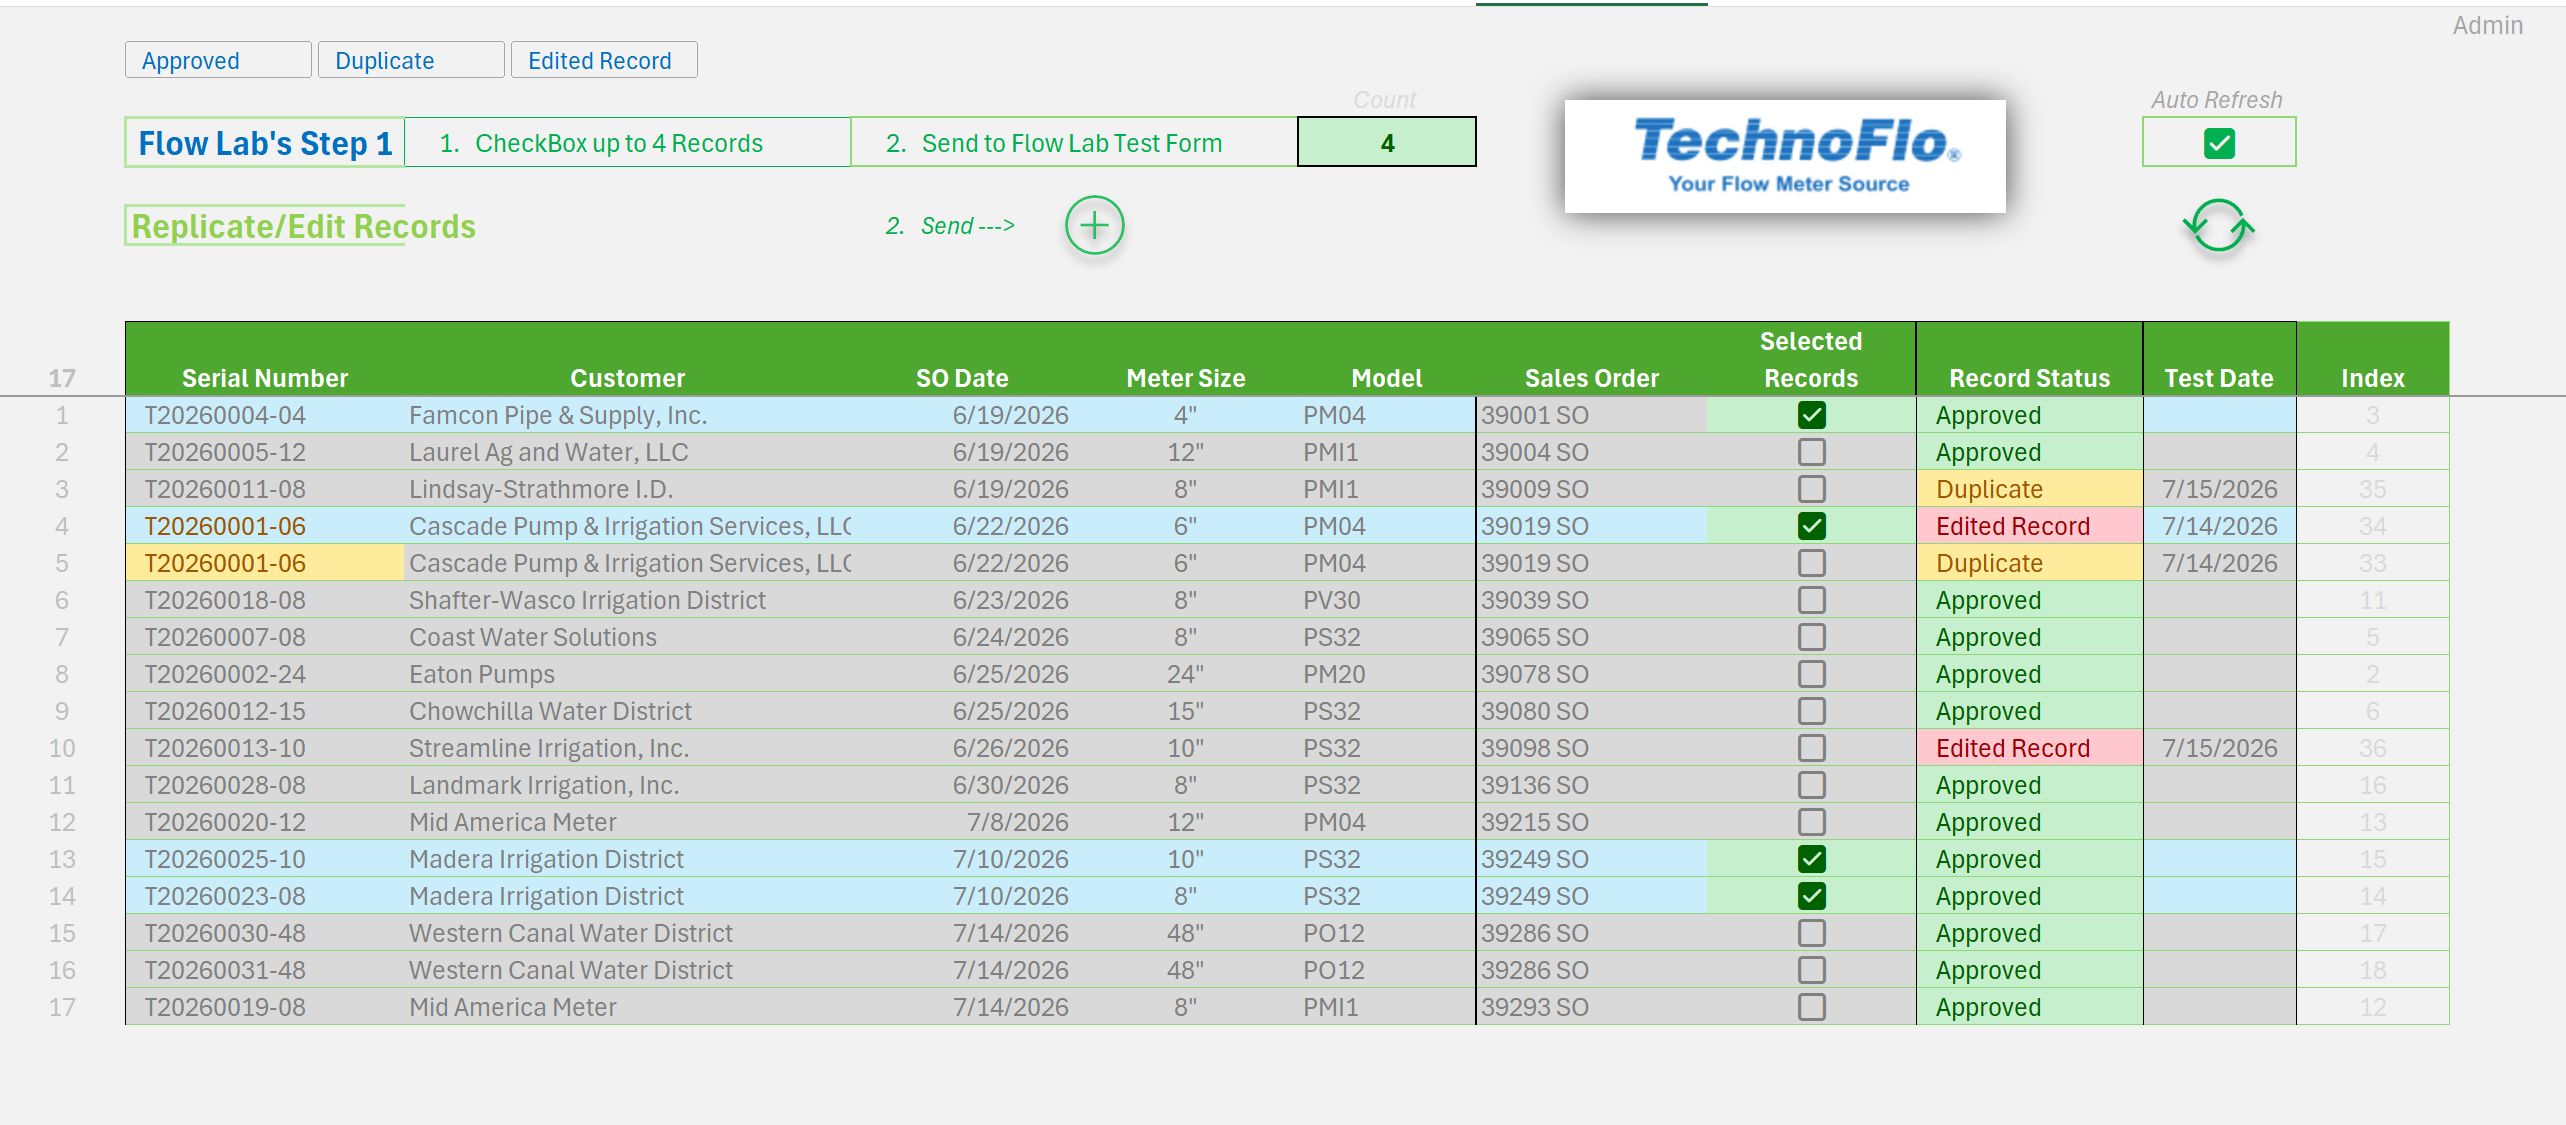
In the image is a simple example of a Power Query Table being used as a REA Form.
Using Power Query as a data entry form is somewhat new. It is powerful.
Toll-Free: 877.392.3539 | Irvine, California: 949.612.3366 | Manhattan, New York: 646.205.3261
We are here to assist with custom solutions in Microsoft Excel 365 with Power Query.
Try our one-on-one Mentoring Services
External Excel Table as the Data Source
For this demonstration, we used a single external Excel Table as the source for all mock data. The objective was to create a simple, easy-to-follow solution that showcases the capabilities of the Review, Edit, and Append (REA) process without introducing unnecessary complexity.
About This Demo: Although the data source is intentionally simple, the demonstration still incorporates the key features and functionality required in real-world scenarios.
Users can review incoming records, edit data as needed, select specific records for processing, and append approved records to a local Excel Table.
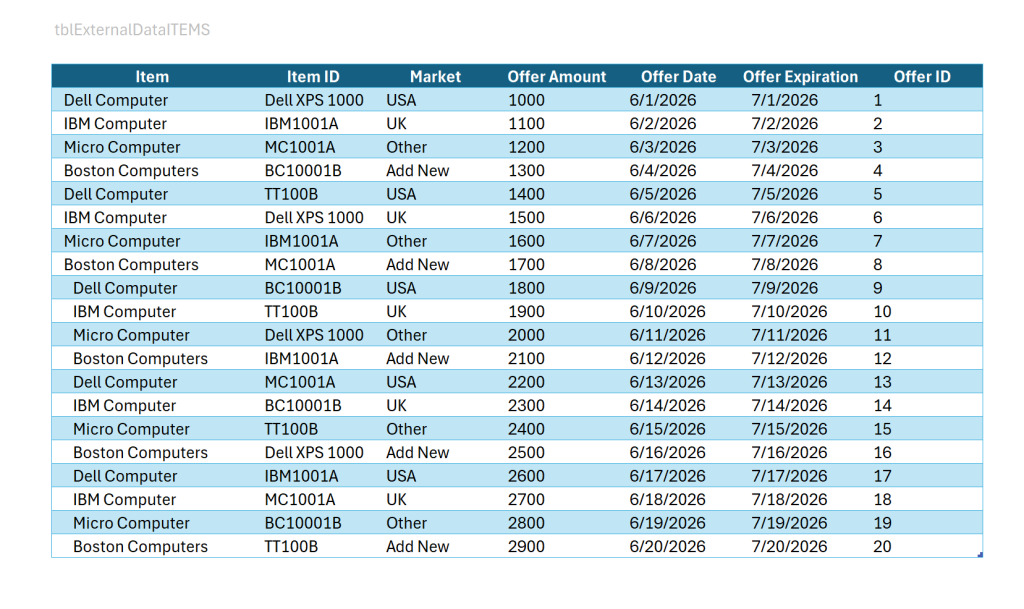
Above is your standard Excel Table, used to hold your data.
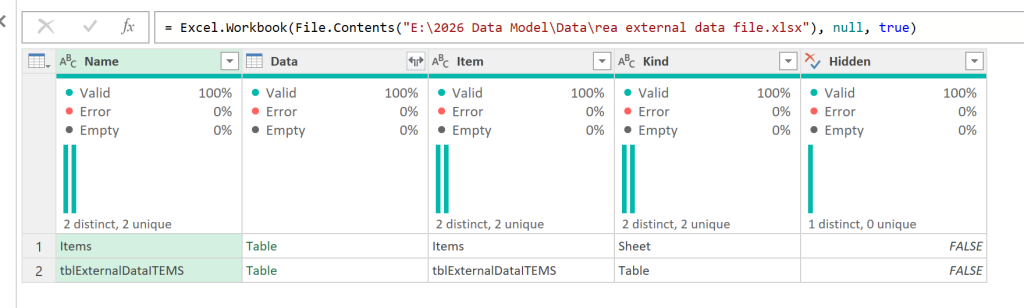
Power Query provides access to the data without the use of VBA or Links.
Local Excel Table to Store the Data
In our demo, we use the Excel Table shown below as the place we will append our data.
Several columns displayed in the table do not exist in the external data source ( See images above and below ). These additional columns are required for the review and data-entry process, so they are added within the Power Query transformation steps.
One such addition is the implementation of Data Validation drop-down lists that supply default values to the query. This provides a simple and user-friendly way for users to set or change default values before processing the data.
The Excel Table also supports manual user interaction for ease of use. Data Validation drop-down lists are used to provide controlled selections for specific fields, while a CheckBox column allows users to easily flag or select records as part of the review process. Add Slicers.
 Please note, it is best to keep the user out of the data tables.
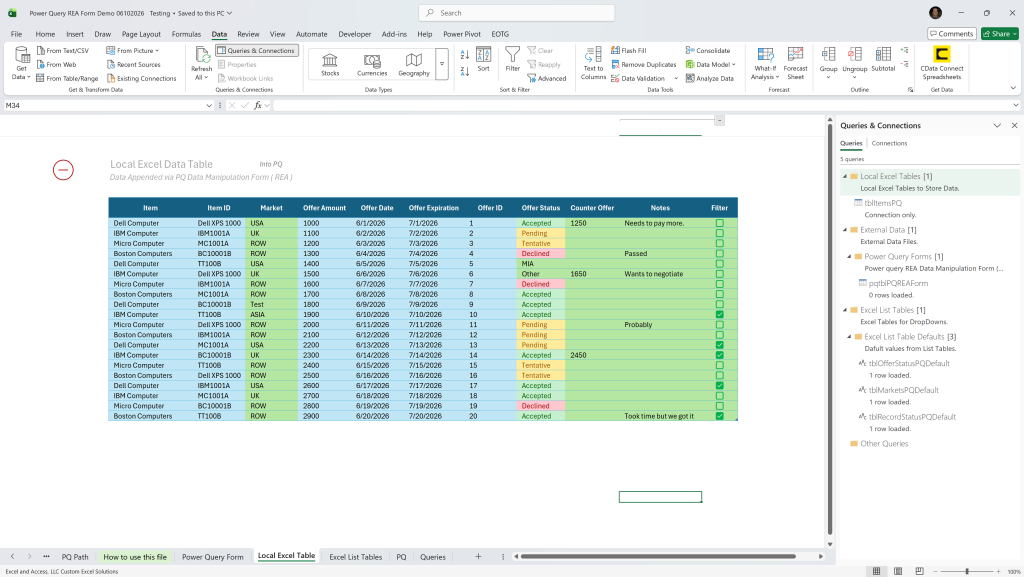
An Excel Table with Drop-Down Validation Lists, CheckBoxes, and Conditional Formatting.
Excel List Tables to Set Default Values for PQ
Here we take Excel List Tables to the next level by adding a Default column. This column uses the relatively new Checkbox in Excel 365. The user is allowed to select one record as the default.
Power Query reads the default value, and it is used in the Power Query REA Form. The Query loads the default value, simplifying the process for the user.
The user can add records, delete records, or change records in the Excel List Table. And they can set the default value.
This tab uses VBA to auto-refresh the queries when a Checkbox is checked. No need to press the Refresh buttons.
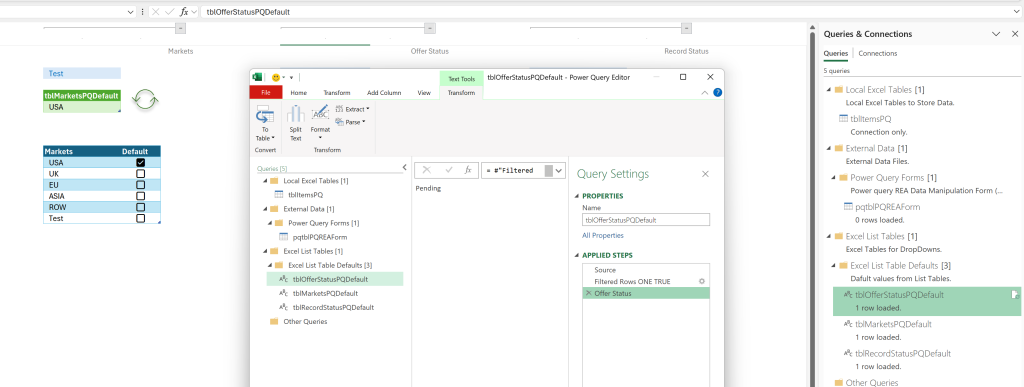
Using Excel List Tables to allow the user to set the Default value greatly simplifies the user experience.
Power Query Table as Data Entry Form
Power Query REA Form, Based on External Data Source
Review, Edit and Append Process ( REA )
This demo illustrates a common requirement: Importing new records from an external data file into an existing Excel table. Users can review and edit the new records, then choose which ones to append to the local dataset.
Why use an REA Form: When the user does not want to automatically append all records at once, which is also very common. Rather they want the opportunity to review each record, edit as desired, and then append only selected records.
In this demo we use a combination of Slicers to allow the user to select which records will be appended. Users like this approach, it is familiar, friendly, easy to understand.
In this demo we use Excel List Tables with the CheckBox feature to set Defaults for Power Query.
In this demo we use minimal vba, for the user experience.
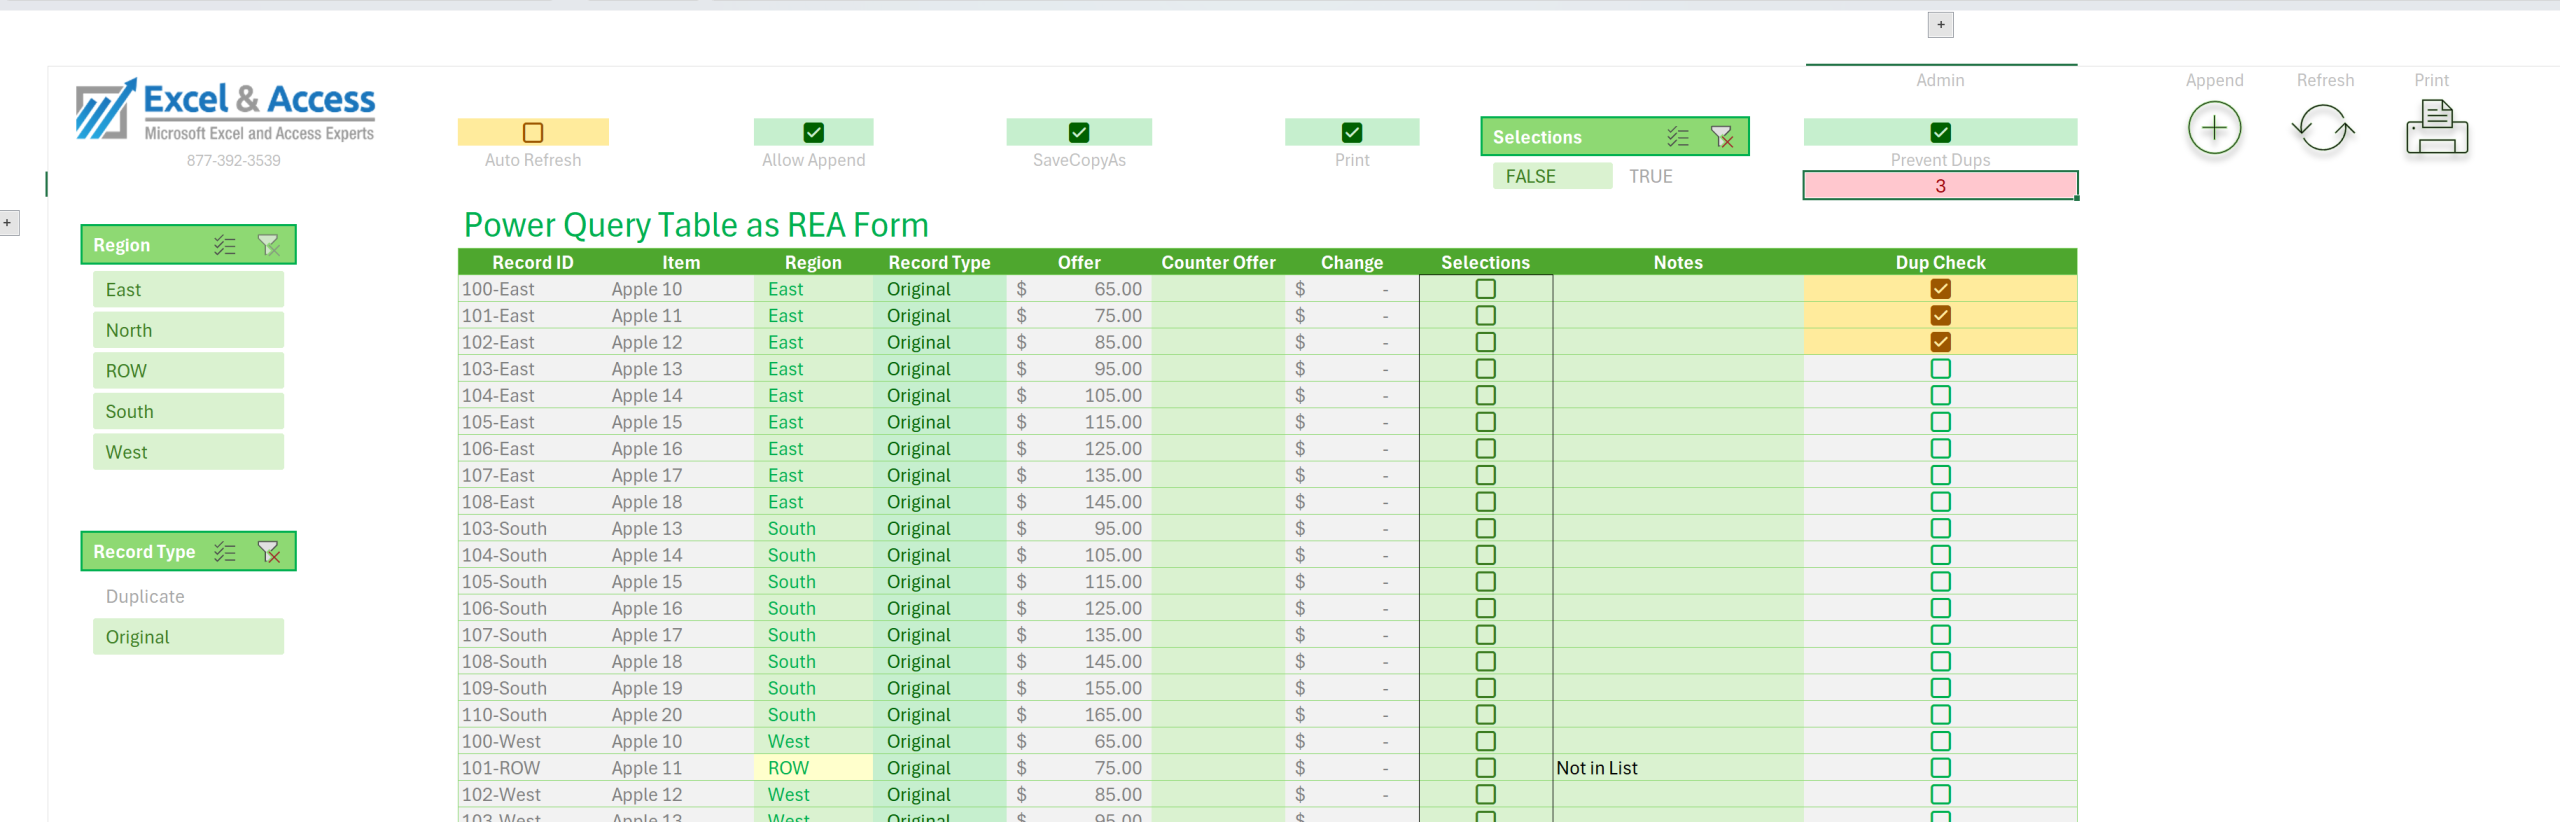
Using a Power Query Table as a Data Entry Form just takes it to another level. It greatly simplifies the process while it greatly reduces the programming effort.
Minimal VBA is used in PQ REA Form
Surprisingly, the use of Power Query brings with it a great reduction in the amount of onsheet Excel functions as well as the use of Excel based VBA. This demo uses very little vba, and all of that is strictly for the user experience.
You use this file with or without VBA. So you can use it on SharePoint if desired, but it will be slightly more manual.
PQ Forms w/out VBA:
You can use RefreshAll on the Ribbon.
You can manually Copy and Paste Special the selected records.
You can manually delete the data from the Excel Table.
VBA allows you to do things in Excel you could not do otherwise.
VBA is how the user interface is done.
Power Query Forms with VBA:
AutoRefresh Query, Event Code, Copy and Paste Special, Message Boxes, etc.
Use the CheckBox to set the Default value. VBA notices this, and Refreshes the appropriate Query.
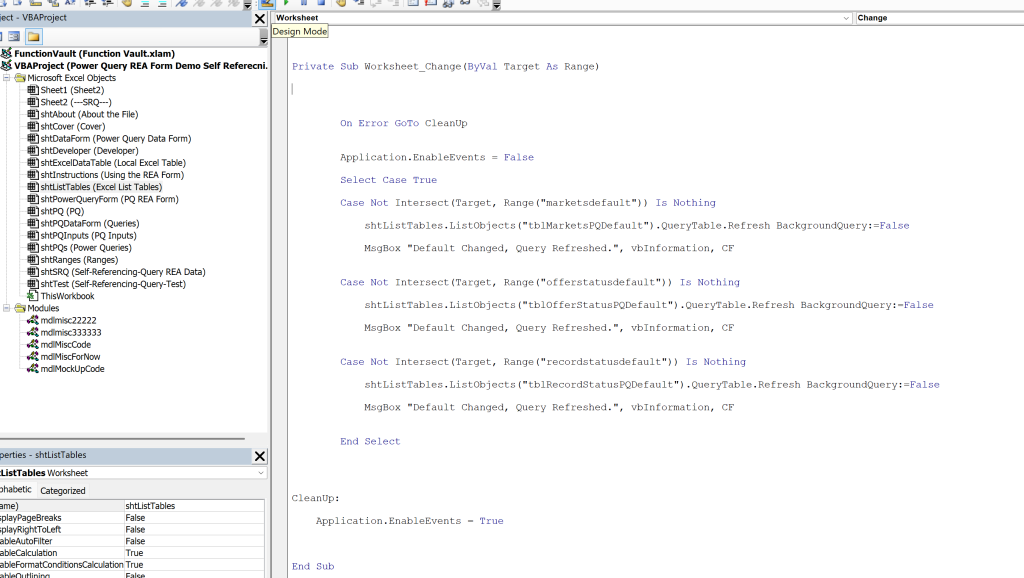
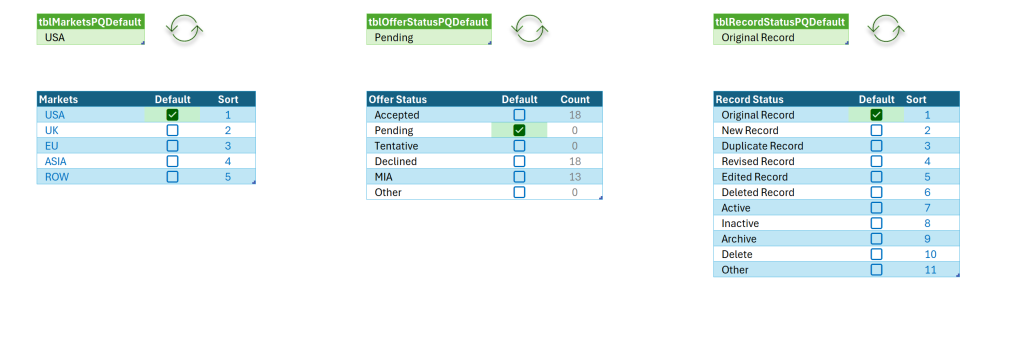
The VBA in the image above this image, is based on the CheckBox in the Excel List Tables. Change the CheckBox, the code fires fire.
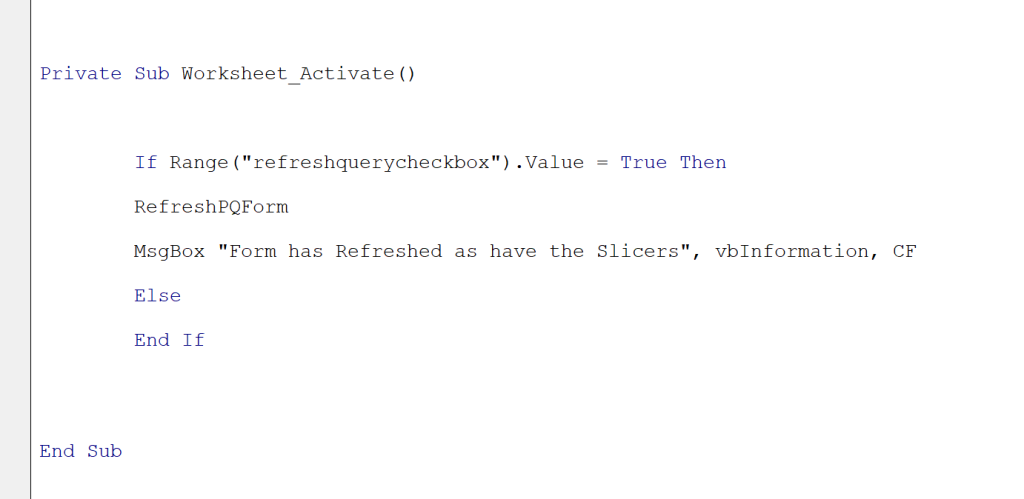
VBA is not dead; it is needed as much as ever, simply due for the user experience.
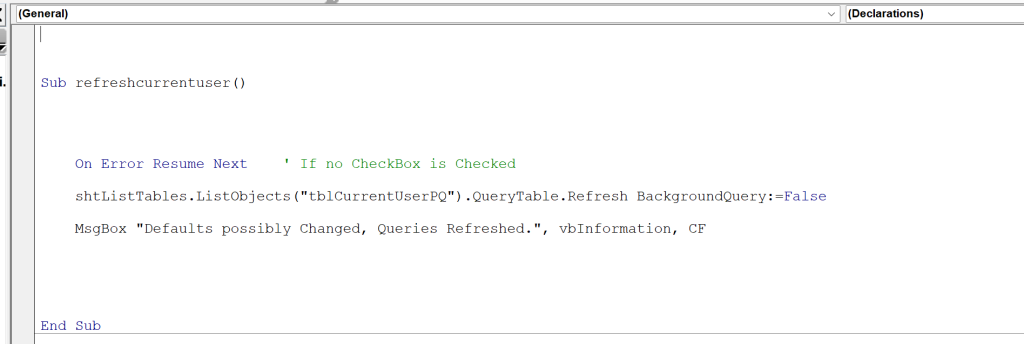
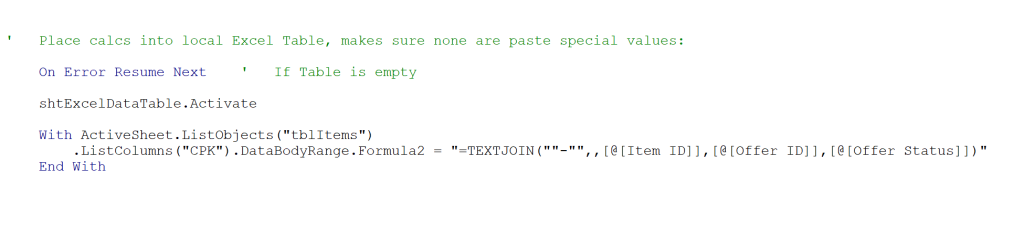
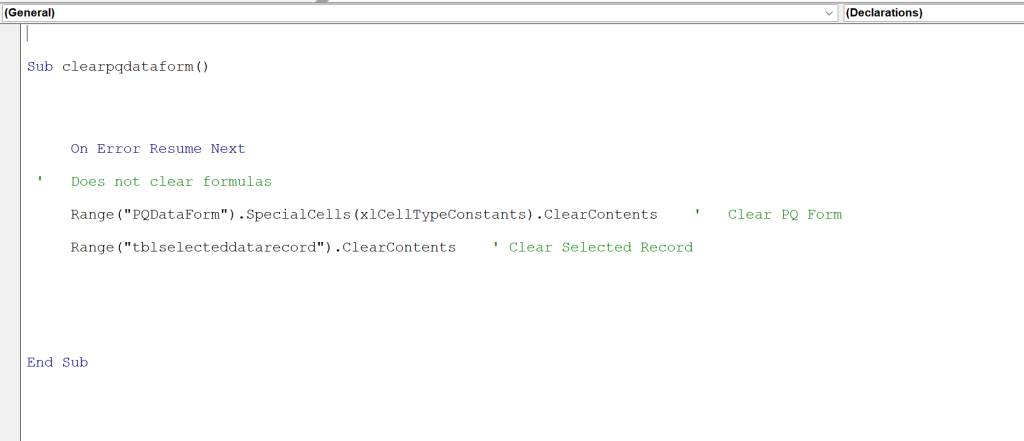
VBA is to automate the process, for the user experience.
How a Power Query REA Form Works, in Detail
Building an REA Form in Power Query is not difficult. It is basically a Power Query Table added to a sheet, then we add Drop-Down Validation Controls, Checkboxes, Slicers, calculations, and some VBA to the Power Query Table. That is pretty much it.
How to Build an REA Form in Excel 365.
- Create your local Excel List Tables ( DropDown Lists ).
- Add a “Default” column, populate the column with the new CheckBox tool.
- Add Data Validation to restrict selection to <= 1.
- When a Checkbox is checked, vba refreshes the query and the file is updated.
- Load the List Table into Power Query.
- This will be used in the Query that creates the Form.
- Create the external Excel data file.
- Create the Excel Table to hold the base data.
- New records will be added to this table, as needed.
- Create the Excel Table to hold the base data.
- Build a Query on the external data file.
- Note, we are only interested in “new” records, records not already in our file.
- Transform the data using Power Query.
- Add any necessary columns to the Query.
- Defaults: Drop-Down Validation Lists
- CheckBoxes to be used as a Filter, by the user, set False as the Default.
- Text fields for Notes, Counter Offer, etc.
- etc.
- Add any necessary columns to the Query.
- Load the PQ Table to a Sheet in the workbook.
- Build the Local Excel Table
- The local Excel Table is built off of this Power Query Table, exact same design.
- Add the same DropDowns, CheckBoxes, etc., that are in the Power Query REA Form, to this Table.
- Load the local Excel Table into Power Query.
- Join to the External data file, showing new records only.
- Left-Anti Join.
- Join to the External data file, showing new records only.
- The local Excel Table is built off of this Power Query Table, exact same design.
- Add the Automation Code.
- This file works without the use of VBA.
- If you want to automate it, use VBA.
- Auto Refresh the Query.
- Copy & Paste Special the Selected records to the local Excel Table.
A Power Query REA Form is easy to build, easy to use, and as we see it, the future in custom Excel development for business. If you need help with this, we are here to help. 877-392-3539.
Conclusion: Power Query REA Forms
We no longer work in Microsoft Access. Though it is in our company name. For small needs we prefer Excel with Power Query.
We no longer work in Excel UserForms. We use Power Query Tables as Forms. We use much less vba this way.
We use much less vba these days, and far fewer onsheet functions as well, all due to the increased use of Power Query.
The next time you find yourself reaching for Microsoft Access or an Excel UserForm, pause, and ask, is there a much simpler way to do this, one with a fraction of the code?
What if you use a Power Query REA Form instead?
Images of the Power Query Based Solution
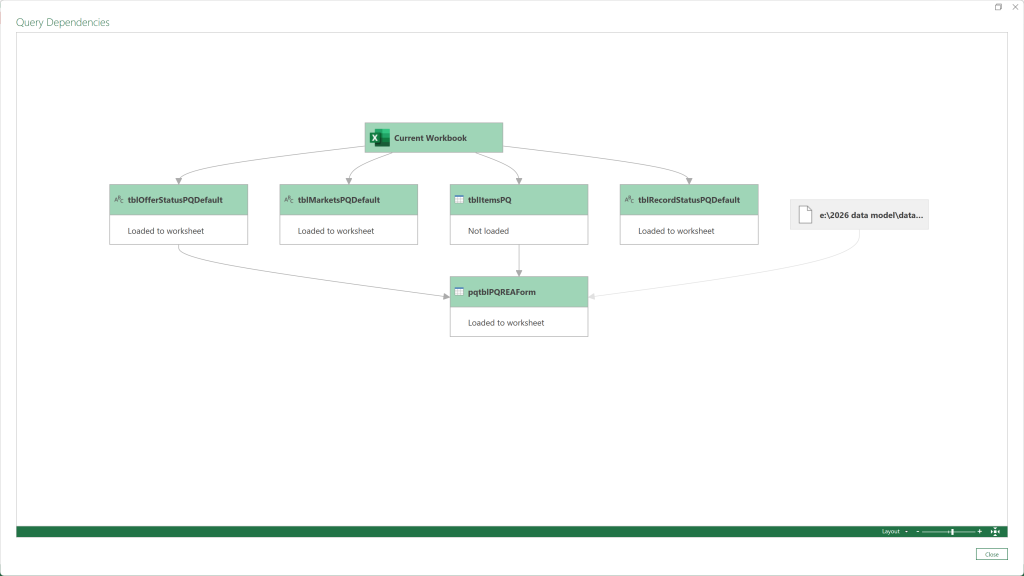
Very simple demo. One external Excel Table, one local Excel Table, and three Excel List Tables.
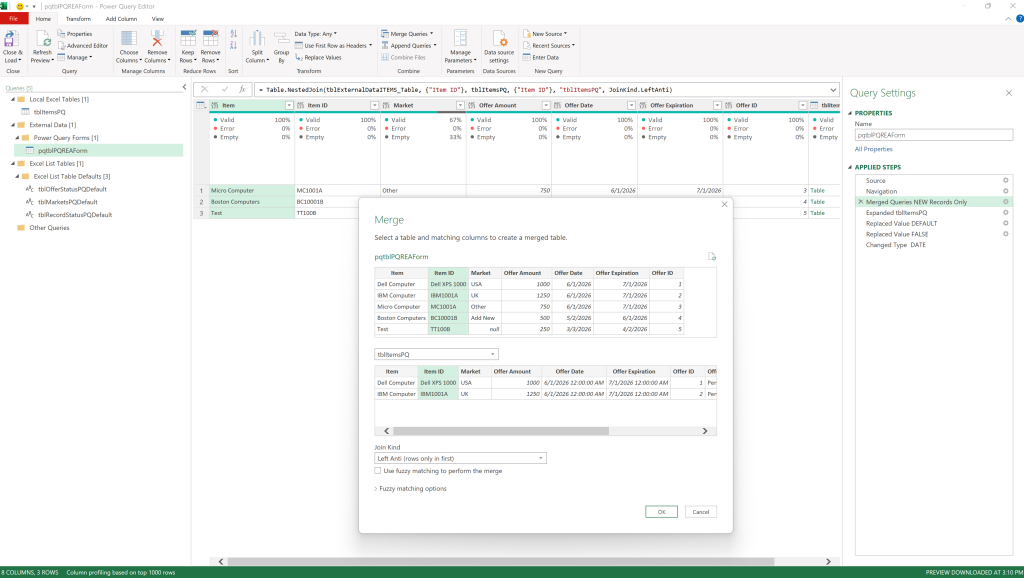
Power Query Editor.
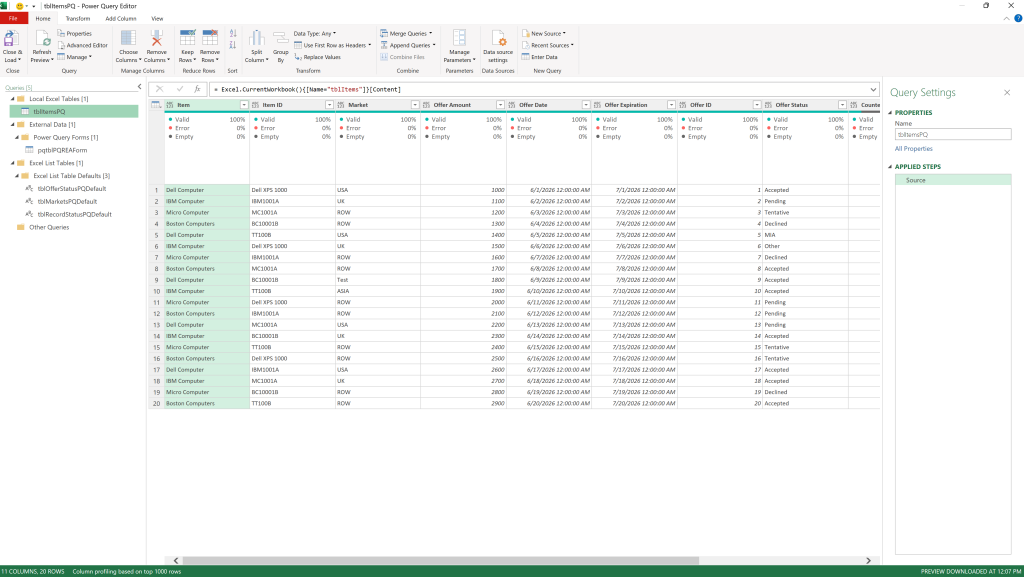
Power Query is surprisingly easy to learn, and in most cases, easy to use.
Toll-Free: 877.392.3539 | Irvine, California: 949.612.3366 | Manhattan, New York: 646.205.3261
Contact us for a Free Consultation Today.
We are here to assist with custom solutions in Microsoft Excel 365 with Power Query.
Try our one-on-one Mentoring Services










“Please note, it is best to keep the user out of the data tables.” NGL, this made me laugh. So true.
On a serious note, I fully agree with using Tables plus validation as entry forms. I created some incredibly complex User Forms back in the day. I was proud of them. You could manipulate entire sets of data with user forms and VBA without ever touching a worksheet cell. But those days are in the past. Microsoft are sunsetting that technology. User Forms look old and outdated. And every piece must be individually coded; they’re inflexible.
Tables are quick to build, easy to adjust, can be made to look clean and modern, and are readable by AI. And, depending on your final implementation, don’t require VBA. All plusses in today’s world.
I have seen your work; I love what you do with PQ, Tables and of course LAMBDA.
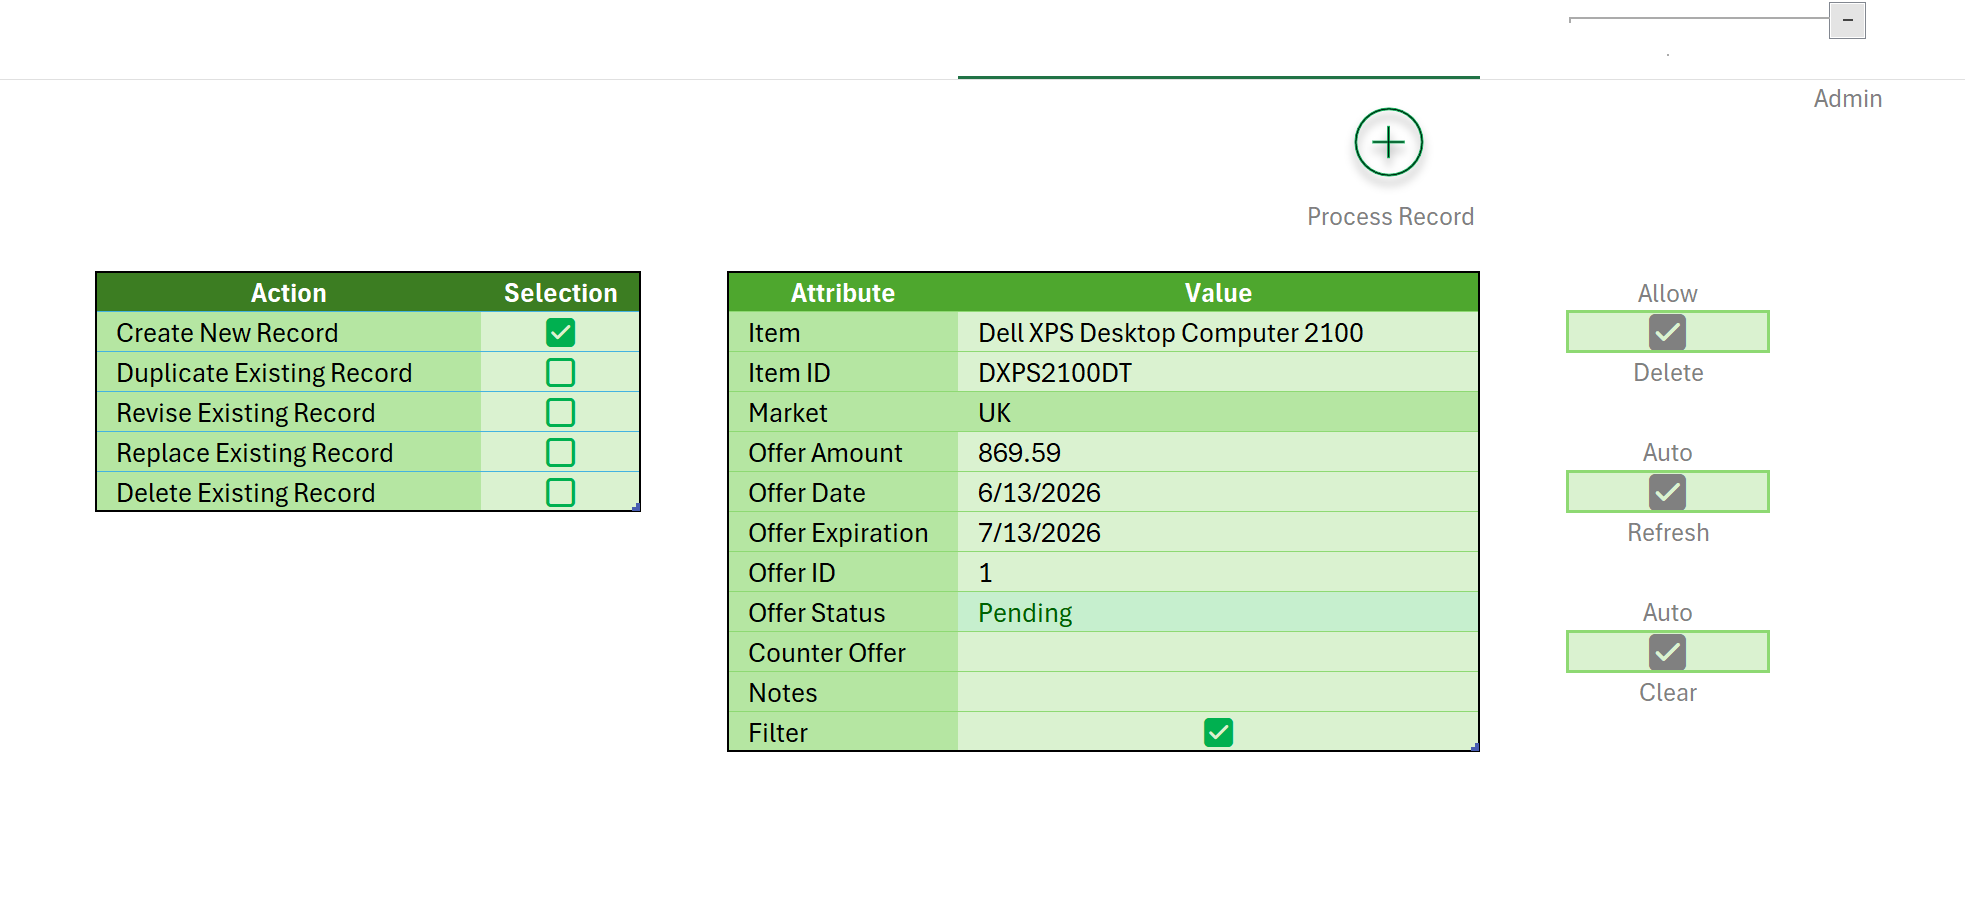
The trick is this, if you keep users out of the local Excel Table, how do they add new records, such as here. But more importantly, how do they edit or delete existing records without direct access to the Table? We cover that next, in our Power Query Data Form post.
Great concept, Christopher. Using Power Query as a lightweight intake form filtered to show only records not already in the local table is an elegant alternative to VBA UserForms that most Excel developers wouldn’t think to try. The combination of slicers for selection, data validation for controlled input, and VBA just for the append step keeps the architecture clean and the maintenance burden low.
The columns-added-in-PQ approach is worth highlighting more prominently. It’s a subtle but important design choice that keeps the source data clean while giving the form the fields it needs.
Looking forward to seeing the finished post.
Jeff Stevens
Thank you Jeff, I appreciate your feedback.
Ah, good point, I will expand on that as that is what drives the solution.
It is a newer approach. I know others that do this, but not many. Clients love it. So simple when compared to Access or UserForms.
Next up, self-referencing query post. Seems the topic has new life.